Apple announced a new version of OS (iOS13), updates (for instance Siri – Voice Experiences ), technologies and features during the Apple Worldwide Developers Conference (WWDC), 2019. After getting a few queries from our clients about integrating dual recording in their iPhone apps, we decided to write this blog. It is a complete tutorial on how to integrate this feature seamlessly.
What you will learn in this tutorial
How to integrate the dual recording feature in an iOS app
We are an iOS app development company that is always keen on learning and implementing the latest features. Our iOS developers are always experimenting with features to bring out the best in our developed apps. In this tutorial, we have explained how to integrate the multi-camera video recording feature in an iPhone app.
It’s been a little while since the WWDC happened in June this year. Just like every year, Apple made a lot of exciting announcements. A few of these announcements include:
- iOS 13
- iPad OS
- Mac OS Catalina
- TVOS 13
- Watch OS 6
New MAC Pro and XDR Display iOS 13 has generated a lot of buzz recently, and rightly so. It is equipped with a lot of new or updated features and functionalities. Let us see some of the new features of it.
What’s new in iOS 13?
- Dark Mode
- Camera Capture
- Swipe Keyboard
- Revamped Reminder App
- ARKit 3 (AR Quick Look, People Occlusion, Motion Capture, Reality Composer, track multiple faces)
- Siri (Voice Experiences. Shortcuts app)
- Sign In with Apple
- Multiple UI Instances
- Camera Capture(Record a video front/back simultaneously)
- Pencil kit
- Combine framework
- Core Data – Sync Core Data to Cloud kit
- Background Tasks
In this iOS tutorial, we will be talking about the Camera Capture functionality where we have used AVMultiCamPiP to capture and record from multiple cameras (front and back).
Multi-camera recording using Camera Capture
Before iOS 13, Apple did not allow to record videos using the front back cameras simultaneously. Now, the users can perform dual camera recording using the back and front camera at the same time. This is done by Camera Capture
PiP in AVMultiCamPiP stands for ‘picture in picture’. This functionality helps to view the video output in full screen and second as the small screen. At any time in between, the user can change the focus.
We created a project called “SODualCamera”, aiming to demonstrate iOS 13 Camera Capture feature on XCode 11. Let’s see the step by step guide to integrate this feature.
Steps to Integrate the Multi Camera Video Recording Feature in an iOS App
Create a new project using XCODE 11.
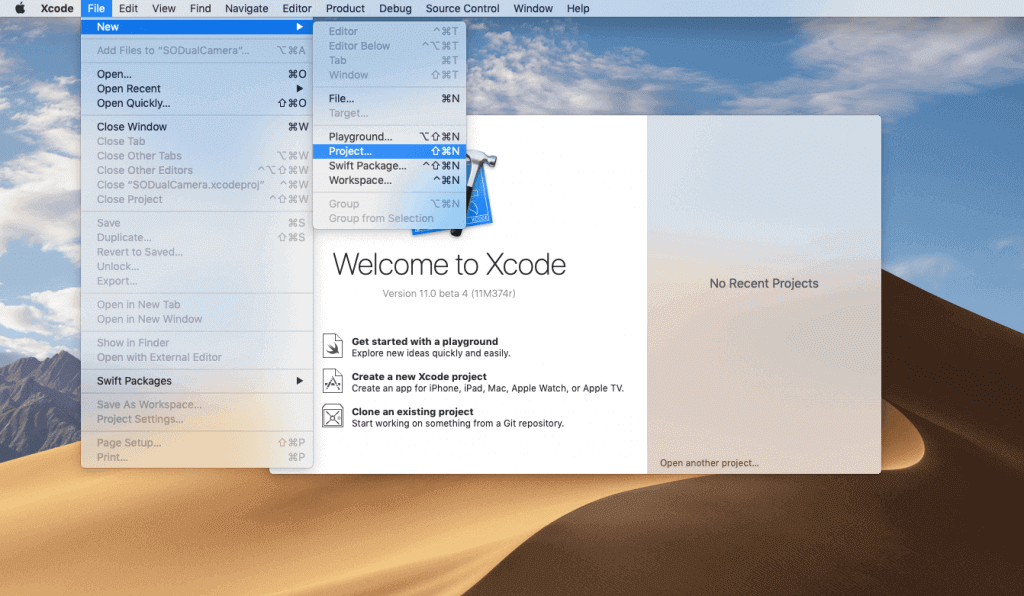
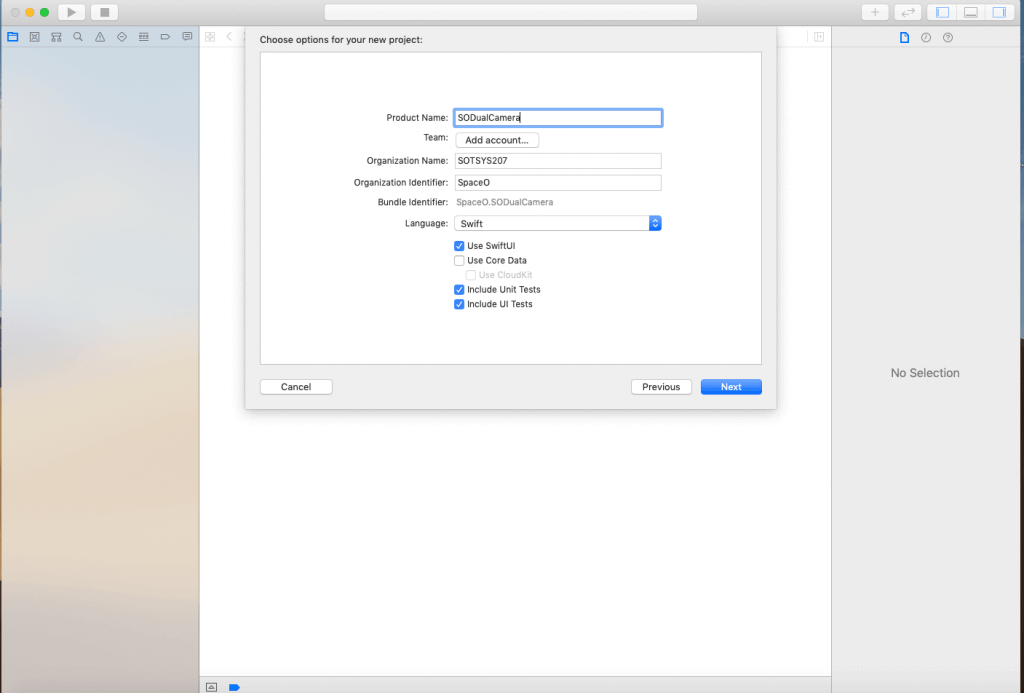
Select “Single View App” in the iOS section and enter the project name. We have kept it as ‘SODualCamera’.

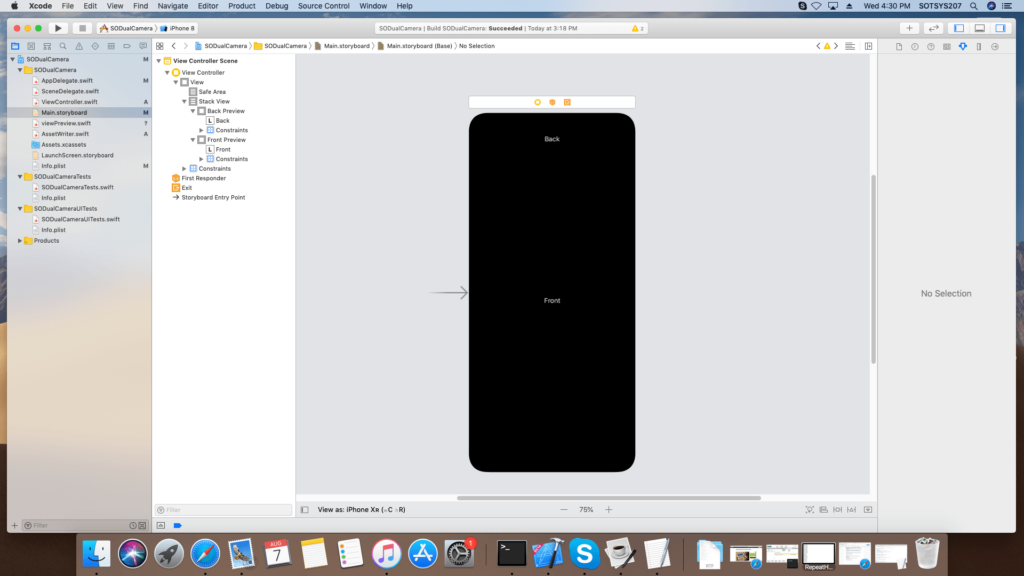
Go to Project Name folder and Open Main.storyboard file. Add Stackview as shown in the figure. In StackView Add two UIView with labels inside UIview.
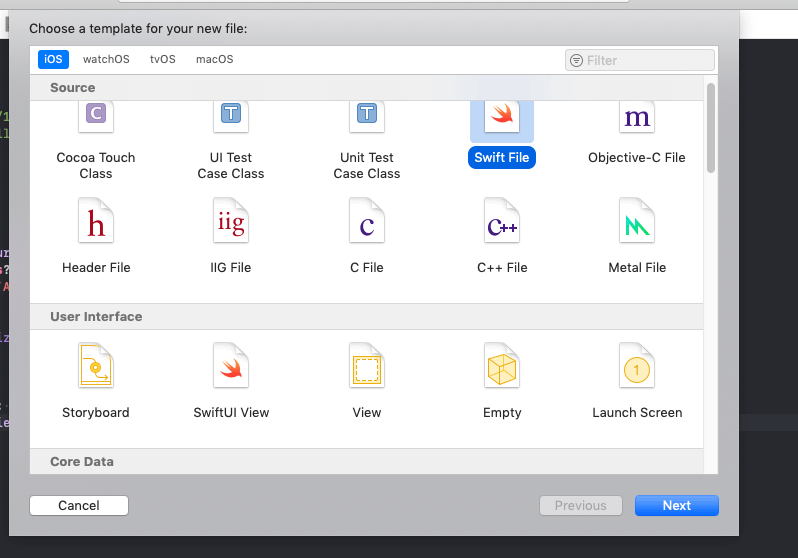
Go to Xcode File Menu and select New and Select File and Select Swift files as shown figure and click the Next button.
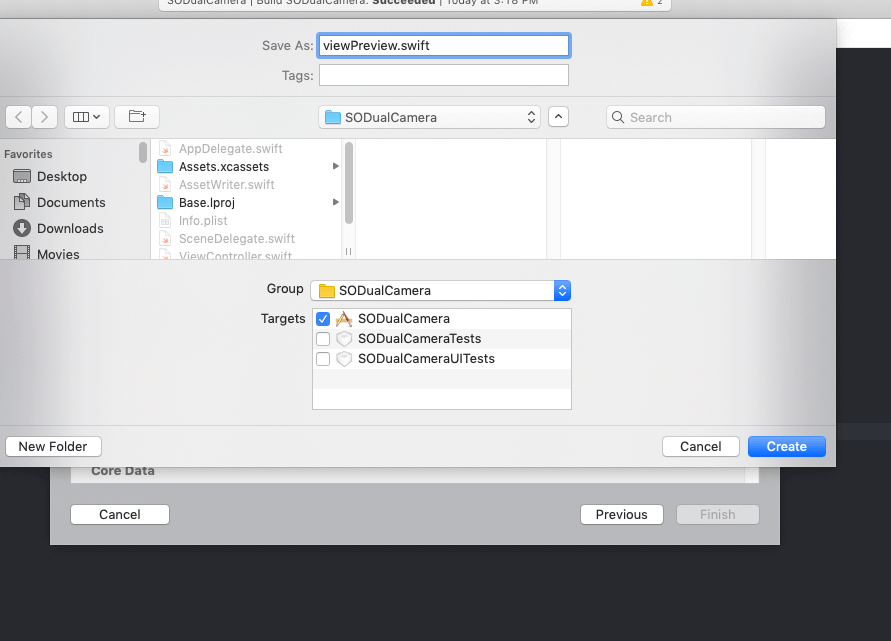
Now Enter file name as ViewPreview.swift.
Now open ViewPreview.swift and add code as below
import AVFoundation

class ViewPreview: UIView {
    var videoPreviewLayer: AVCaptureVideoPreviewLayer {
        guard let layer = layer as? AVCaptureVideoPreviewLayer else {
            fatalError("Expected `AVCaptureVideoPreviewLayer` type for layer. Check PreviewView.layerClass implementation.")
        }

        layer.videoGravity = .resizeAspect
        return layer
    }

    override class var layerClass: AnyClass {
        return AVCaptureVideoPreviewLayer.self
    }
}
Go to Main.storyboard and select StackView. Under StackView, select UIView and add custom class as “ViewPreview” as shown in figure.

Repeat the same process for the second view.
Create outlets for both of View. We are going to use this view as a Preview of camera output.
@IBOutlet weak var backPreview: ViewPreview!
@IBOutlet weak var frontPreview: ViewPreview!
As we are aiming to capture video, we need to import the AVFoundation Framework.We are saving output video to the user’s photo library and we also need to import the Photos framework in ViewController.swift
import AVFoundation
import Photos
Declare a variable to perform dual video session.
var dualVideoSession = AVCaptureMultiCamSession()
Create an object of AVCaptureMultiCamSession to execute camera session.
var audioDeviceInput: AVCaptureDeviceInput?
For Audio Device input to record audio while running dual video session, you need to declare variables as follows:
var backDeviceInput:AVCaptureDeviceInput?
var backVideoDataOutput = AVCaptureVideoDataOutput()
var backViewLayer:AVCaptureVideoPreviewLayer?
var backAudioDataOutput = AVCaptureAudioDataOutput()

var frontDeviceInput:AVCaptureDeviceInput?
var frontVideoDataOutput = AVCaptureVideoDataOutput()
var frontViewLayer:AVCaptureVideoPreviewLayer?
var frontAudioDataOutput = AVCaptureAudioDataOutput()
In ViewDidAppear add the following code to detect if the app is running on Simulator.
override func viewDidAppear(_ animated: Bool) {
    super.viewDidAppear(animated)

    #if targetEnvironment(simulator)
    let alertController = UIAlertController(title: "SODualCamera", message: "Please run on physical device", preferredStyle: .alert)
        alertController.addAction(UIAlertAction(title: "OK",style: .cancel, handler: nil))
        self.present(alertController, animated: true, completion: nil)
        return
    #endif
}
Create a Setup method to configure the video sessions and also manage user permission. If an app is running on Simulator then return immediately.
#if targetEnvironment(simulator)
    return
#endif
Now check for video recording permission using this code:
switch AVCaptureDevice.authorizationStatus(for: .video) {
    case .authorized:
        // The user has previously granted access to the camera.
            configureDualVideo()
        break

    case .notDetermined:

        AVCaptureDevice.requestAccess(for: .video, completionHandler: { granted in
            if granted{
                self.configureDualVideo()
            }
        })

        break

    default:
        // The user has previously denied access.
    DispatchQueue.main.async {
        let changePrivacySetting = "Device doesn't have permission to use the camera, please change privacy settings"
        let message = NSLocalizedString(changePrivacySetting, comment: "Alert message when the user has denied access to the camera")
        let alertController = UIAlertController(title: "Error", message: message, preferredStyle: .alert)

        alertController.addAction(UIAlertAction(title: "OK", style: .cancel, handler: nil))

        alertController.addAction(UIAlertAction(title: "Settings", style: .`default`,handler: { _ in
            if let settingsURL = URL(string: UIApplication.openSettingsURLString) {
                UIApplication.shared.open(settingsURL,  options: [:], completionHandler: nil)
            }
        }))

        self.present(alertController, animated: true, completion: nil)
    }
}
After getting the user permission to record video, we configure the video session parameters.
First, we need to check whether the device supports MultiCam session
if !AVCaptureMultiCamSession.isMultiCamSupported {
    DispatchQueue.main.async {
        let alertController = UIAlertController(title: "Error", message: "Device is not supporting multicam feature", preferredStyle: .alert)
        alertController.addAction(UIAlertAction(title: "OK", style: .cancel, handler: nil))
        self.present(alertController, animated: true, completion: nil)
    }
    return
}
Now, we set up the front camera first.
func setUpBackCamera() -> Bool {
    //start configuring dual video session
    dualVideoSession.beginConfiguration()
    defer {
        //save configuration setting
        dualVideoSession.commitConfiguration()
    }

    //search back camera
    guard let backCamera = AVCaptureDevice.default(.builtInWideAngleCamera, for: .video, position: .back) else {
        print("no back camera")
        return false
    }

    // append back camera input to dual video session
    do {
        backDeviceInput = try AVCaptureDeviceInput(device: backCamera)

        guard let backInput = backDeviceInput, dualVideoSession.canAddInput(backInput) else {
            print("no back camera device input")
            return false
        }
        dualVideoSession.addInputWithNoConnections(backInput)
    } catch {
        print("no back camera device input: \(error)")
        return false
    }

    // seach back video port
    guard let backDeviceInput = backDeviceInput,
        let backVideoPort = backDeviceInput.ports(for: .video, sourceDeviceType: backCamera.deviceType, sourceDevicePosition: backCamera.position).first else {
            print("no back camera input's video port")
            return false
    }

    // append back video output
    guard dualVideoSession.canAddOutput(backVideoDataOutput) else {
        print("no back camera output")
        return false
    }
    dualVideoSession.addOutputWithNoConnections(backVideoDataOutput)
    backVideoDataOutput.videoSettings = [kCVPixelBufferPixelFormatTypeKey as String: Int(kCVPixelFormatType_32BGRA)]
    backVideoDataOutput.setSampleBufferDelegate(self, queue: dualVideoSessionOutputQueue)

    // connect back output to dual video connection
    let backOutputConnection = AVCaptureConnection(inputPorts: [backVideoPort], output: backVideoDataOutput)
    guard dualVideoSession.canAddConnection(backOutputConnection) else {
        print("no connection to the back camera video data output")
        return false
    }
    dualVideoSession.addConnection(backOutputConnection)
    backOutputConnection.videoOrientation = .portrait

    // connect back input to back layer
    guard let backLayer = backViewLayer else {
        return false
    }
    let backConnection = AVCaptureConnection(inputPort: backVideoPort, videoPreviewLayer: backLayer)
    guard dualVideoSession.canAddConnection(backConnection) else {
        print("no a connection to the back camera video preview layer")
        return false
    }
    dualVideoSession.addConnection(backConnection)
    return true
}
We have now successfully configured the front camera for a video session.
We need to follow the same process for the back camera setup.
func setUpBackCamera() -> Bool {
    // start configuring dual video session
    dualVideoSession.beginConfiguration()
    defer {
        // save configuration setting
        dualVideoSession.commitConfiguration()
    }

    // search back camera
    guard let backCamera = AVCaptureDevice.default(.builtInWideAngleCamera, for: .video, position: .back) else {
        print("no back camera")
        return false
    }

    // append back camera input to dual video session
    do {
        backDeviceInput = try AVCaptureDeviceInput(device: backCamera)

        guard let backInput = backDeviceInput, dualVideoSession.canAddInput(backInput) else {
            print("no back camera device input")
            return false
        }
        dualVideoSession.addInputWithNoConnections(backInput)
    } catch {
        print("no back camera device input: \(error)")
        return false
    }

    // search back video port
    guard let backDeviceInput = backDeviceInput,
        let backVideoPort = backDeviceInput.ports(for: .video, sourceDeviceType: backCamera.deviceType, sourceDevicePosition: backCamera.position).first else {
        print("no back camera input's video port")
        return false
    }

    // append back video output
    guard dualVideoSession.canAddOutput(backVideoDataOutput) else {
        print("no back camera output")
        return false
    }
    dualVideoSession.addOutputWithNoConnections(backVideoDataOutput)
    backVideoDataOutput.videoSettings = [kCVPixelBufferPixelFormatTypeKey as String: Int(kCVPixelFormatType_32BGRA)]
    backVideoDataOutput.setSampleBufferDelegate(self, queue: dualVideoSessionOutputQueue)

    // connect back output to dual video connection
    let backOutputConnection = AVCaptureConnection(inputPorts: [backVideoPort], output: backVideoDataOutput)
    guard dualVideoSession.canAddConnection(backOutputConnection) else {
        print("no connection to the back camera video data output")
        return false
    }
    dualVideoSession.addConnection(backOutputConnection)
    backOutputConnection.videoOrientation = .portrait

    // connect back input to back layer
    guard let backLayer = backViewLayer else {
        return false
    }
    let backConnection = AVCaptureConnection(inputPort: backVideoPort, videoPreviewLayer: backLayer)
    guard dualVideoSession.canAddConnection(backConnection) else {
        print("no connection to the back camera video preview layer")
        return false
    }
    dualVideoSession.addConnection(backConnection)

    return true
}

func setUpFrontCamera() -> Bool {
    // start configuring dual video session
    dualVideoSession.beginConfiguration()
    defer {
        // save configuration setting
        dualVideoSession.commitConfiguration()
    }

    // search front camera for dual video session
    guard let frontCamera = AVCaptureDevice.default(.builtInWideAngleCamera, for: .video, position: .front) else {
        print("no front camera")
        return false
    }

    // append front camera input to dual video session
    do {
        frontDeviceInput = try AVCaptureDeviceInput(device: frontCamera)

            guard let frontInput = frontDeviceInput, dualVideoSession.canAddInput(frontInput) else {
                print("no front camera input")
                return false
            }
            dualVideoSession.addInputWithNoConnections(frontInput)
        } catch {
            print("no front input: \(error)")
            return false
        }

        // search front video port for dual video session
        guard let frontDeviceInput = frontDeviceInput,
            let frontVideoPort = frontDeviceInput.ports(for: .video, sourceDeviceType: frontCamera.deviceType, sourceDevicePosition: frontCamera.position).first else {
            print("no front camera device input's video port")
            return false
        }

        // append front video output to dual video session
        guard dualVideoSession.canAddOutput(frontVideoDataOutput) else {
            print("no the front camera video output")
            return false
        }
        dualVideoSession.addOutputWithNoConnections(frontVideoDataOutput)
        frontVideoDataOutput.videoSettings = [kCVPixelBufferPixelFormatTypeKey as String: Int(kCVPixelFormatType_32BGRA)]
        frontVideoDataOutput.setSampleBufferDelegate(self, queue: dualVideoSessionOutputQueue)

        // connect front output to dual video session
        let frontOutputConnection = AVCaptureConnection(inputPorts: [frontVideoPort], output: frontVideoDataOutput)
        guard dualVideoSession.canAddConnection(frontOutputConnection) else {
            print("no connection to the front video output")
            return false
        }
        dualVideoSession.addConnection(frontOutputConnection)
        frontOutputConnection.videoOrientation = .portrait
        frontOutputConnection.automaticallyAdjustsVideoMirroring = false
        frontOutputConnection.isVideoMirrored = true

        // connect front input to front layer
        guard let frontLayer = frontViewLayer else {
            return false
        }
        let frontLayerConnection = AVCaptureConnection(inputPort: frontVideoPort, videoPreviewLayer: frontLayer)
        guard dualVideoSession.canAddConnection(frontLayerConnection) else {
            print("no connection to front layer")
            return false
        }
        dualVideoSession.addConnection(frontLayerConnection)
        frontLayerConnection.automaticallyAdjustsVideoMirroring = false
        frontLayerConnection.isVideoMirrored = true

        return true
}
After Setuping Front and Back Camera, we need to configure for Audio. First, we need to find the Audio Device Input and then add it to Session. Then find Audio port for front and back camera and add that port to front audio output and video output respectively.
Code looks like this
func setUpAudio() -> Bool {
    // start configuring dual video session
    dualVideoSession.beginConfiguration()
    defer {
        // save configuration setting
        dualVideoSession.commitConfiguration()
    }

    // search audio device for dual video session
    guard let audioDevice = AVCaptureDevice.default(for: .audio) else {
        print("no the microphone")
        return false
    }

    // append audio to dual video session
    do {
        audioDeviceInput = try AVCaptureDeviceInput(device: audioDevice)

        guard let audioInput = audioDeviceInput,
            dualVideoSession.canAddInput(audioInput) else {
                print("no audio input")
                return false
        }
        dualVideoSession.addInputWithNoConnections(audioInput)
    } catch {
        print("no audio input: \(error)")
        return false
    }

    // search audio port back
    guard let audioInputPort = audioDeviceInput,
    let backAudioPort = audioInputPort.ports(for: .audio, sourceDeviceType: audioDevice.deviceType, sourceDevicePosition: .back).first else {
        print("no front back port")
        return false
    }

    // search audio port front
    guard let frontAudioPort = audioInputPort.ports(for: .audio, sourceDeviceType: audioDevice.deviceType, sourceDevicePosition: .front).first else {
        print("no front audio port")
        return false
    }

    // append back output to dual video session
    guard dualVideoSession.canAddOutput(backAudioDataOutput) else {
        print("no back audio data output")
        return false
    }
    dualVideoSession.addOutputWithNoConnections(backAudioDataOutput)
    backAudioDataOutput.setSampleBufferDelegate(self, queue: dualVideoSessionOutputQueue)

    // append front output to dual video session
    guard dualVideoSession.canAddOutput(frontAudioDataOutput) else {
        print("no front audio data output")
        return false
    }
    dualVideoSession.addOutputWithNoConnections(frontAudioDataOutput)
    frontAudioDataOutput.setSampleBufferDelegate(self, queue: dualVideoSessionOutputQueue)

    // add back output to dual video session
    let backOutputConnection = AVCaptureConnection(inputPorts: [backAudioPort], output: backAudioDataOutput)
    guard dualVideoSession.canAddConnection(backOutputConnection) else {
        print("no back audio connection")
        return false
    }
    dualVideoSession.addConnection(backOutputConnection)

    // add front output to dual video session
    let frontutputConnection = AVCaptureConnection(inputPorts: [frontAudioPort], output: frontAudioDataOutput)
    guard dualVideoSession.canAddConnection(frontutputConnection) else {
        print("no front audio connection")
        return false
    }
    dualVideoSession.addConnection(frontutputConnection)

    return true
}
Now we have successfully configured Front, Back Camera, and Audio.
Now when we start a session, it will send output in CMSampleBuffer. We have to collect this sample buffer output and perform the required operation on it. For this, we need to set the sample delegate method for Camera and Audio. We have already set up delegate for Front, Back Camera and Audio using the following code:
frontVideoDataOutput.setSampleBufferDelegate(self, queue: dualVideoSessionOutputQueue)
backVideoDataOutput.setSampleBufferDelegate(self, queue: dualVideoSessionOutputQueue)
backAudioDataOutput.setSampleBufferDelegate(self, queue: dualVideoSessionOutputQueue)
To handle runtime error for a session, we need to add observer as follows:
NotificationCenter.default.addObserver(self, selector: #selector(sessionRuntimeError), name: .AVCaptureSessionRuntimeError,object: dualVideoSession)
NotificationCenter.default.addObserver(self, selector: #selectorspan>(sessionRuntimeError), name: .AVCaptureSessionWasInterrupted, object: dualVideoSession)
NotificationCenter.default.addObserver(self, selector: #selectorspan>(sessionRuntimeError), name: .AVCaptureSessionInterruptionEnded, object: dualVideoSession)
So now we are ready to launch the session. We are going to use a different queue for the session as when we run the session on the main thread, it causes performance issues, lagging, memory leaking. Start the session using this code
dualVideoSessionQueue.async {
    self.dualVideoSession.startRunning()
}
Now, we will Add Gesture recognizer for starting and stopping the recording in the setup method as follows:
func addGestures() {
    let tapSingle = UITapGestureRecognizer(target: self, action: #selector(self.handleSingleTap(_:)))
    tapSingle.numberOfTapsRequired = 1
    self.view.addGestureRecognizer(tapSingle)

    let tapDouble = UITapGestureRecognizer(target: self, action: #selector(self.handleDoubleTap(_:)))
    tapDouble.numberOfTapsRequired = 2
    self.view.addGestureRecognizer(tapDouble)

    tapSingle.require(toFail: tapDouble)
    //differentiate single tap and double tap recognition if the user do both gestures simultaneously.
}
In Apple Capture demo, they have used AVCapture Delegate method to fetch front and back video. Here, we are not going to use this Sample Output Delegate method. We are going to use ReplayKit to record it. We will do screen recording to generate output video here.
Import Replaykit framework as follows:
import ReplayKit
Create one shared object of RPScreenRecorder, to start and stop screen recording.
let screenRecorder = RPScreenRecorder.shared()
We will track recording status using isRecording variable.
var isRecording = false
When the user taps on the screen once, it starts screen recording and when user double taps on screen it stops screen recording and saves output video to the user’s photo library.We have used one custom class for appending video and audio output to one video output using AssetWriter.swift
import UIKit
import Foundation
import AVFoundation
import ReplayKit
import Photos

extension UIApplication {
    class func getTopViewController(base: >UIViewController? = >UIApplication.>shared.keyWindow?.rootViewController) -> UIViewController? {
        if let nav = base as? UINavigationController {
            return getTopViewController(base: nav.visibleViewController)
        } else if let tab = base as? UITabBarController, let selected = tab.selectedViewController {
            return getTopViewController(base: selected)
        } else if let presented = base?.presentedViewController {
            return getTopViewController(base: presented)
        }
        return base
    }
}

class AssetWriter {
    private var assetWriter: AVAssetWriter?
    private var videoInput: AVAssetWriterInput?
    private var audioInput: AVAssetWriterInput?
    private let fileName: String

    let writeQueue = DispatchQueue(label: "writeQueue")

    init(fileName: String) {
        self.fileName = fileName
    }

    private var videoDirectoryPath: String {
        let dir = NSSearchPathForDirectoriesInDomains(.documentDirectory, .userDomainMask, true)[0]
        return dir + "/Videos"
    }

    private var filePath: String {
        return videoDirectoryPath + "/\(fileName)"
    }

    private func setupWriter(buffer: CMSampleBuffer) {
        if FileManager.default.fileExists(atPath: videoDirectoryPath) {
            do {
                try FileManager.default.removeItem(atPath: videoDirectoryPath)
            } catch {
                print("fail to removeItem")
            }
        }
        do {
            try FileManager.default.createDirectory(atPath: videoDirectoryPath, withIntermediateDirectories: true, attributes: nil)
        } catch {
            print("fail to createDirectory")
        }

        self.assetWriter = try? AVAssetWriter(outputURL: URL(fileURLWithPath: filePath), fileType: AVFileType.mov)

        let writerOutputSettings = [
            AVVideoCodecKey: AVVideoCodecType.h264,
            AVVideoWidthKey: UIScreen.main.bounds.width,
            AVVideoHeightKey: UIScreen.main.bounds.height,
            ] as [String : Any]

        self.videoInput = AVAssetWriterInput(mediaType: AVMediaType.video, outputSettings: writerOutputSettings)
        self.videoInput?.expectsMediaDataInRealTime = true

        guard let format = CMSampleBufferGetFormatDescription(buffer),
            let stream = CMAudioFormatDescriptionGetStreamBasicDescription(format) else {
                print("fail to setup audioInput")
                return
        }

        let audioOutputSettings = [
            AVFormatIDKey : kAudioFormatMPEG4AAC,
            AVNumberOfChannelsKey : stream.pointee.mChannelsPerFrame,
            AVSampleRateKey : stream.pointee.mSampleRate,
            AVEncoderBitRateKey : 64000
        ] as [String : Any]

        self.audioInput = AVAssetWriterInput(mediaType: AVMediaType.audio, outputSettings: audioOutputSettings)
        self.audioInput?.expectsMediaDataInRealTime = true

        if let videoInput = self.videoInput, (self.assetWriter?.canAdd(videoInput))! {
            self.assetWriter?.add(videoInput)
        }

        if let audioInput = self.audioInput, (self.assetWriter?.canAdd(audioInput))! {
            self.assetWriter?.add(audioInput)
        }

        public func write(buffer: CMSampleBuffer, bufferType: RPSampleBufferType) {
            writeQueue.sync {
                if assetWriter == nil {
                    if bufferType == .audioApp {
                        setupWriter(buffer: buffer)
                    }
                }

                if assetWriter == nil {
                    return
                }

                if self.assetWriter?.status == .unknown {
                    print("Start writing")
                    let startTime = CMSampleBufferGetPresentationTimeStamp(buffer)
                    self.assetWriter?.startWriting()
                    self.assetWriter?.startSession(atSourceTime: startTime)
                }
                if self.assetWriter?.status == .failed {
                    print("assetWriter status: failed error: \(String(describing: self.assetWriter?.error))")
                    return
                }

                if CMSampleBufferDataIsReady(buffer) == true {
                    if bufferType == .video {
                        if let videoInput = self.videoInput, videoInput.isReadyForMoreMediaData {
                            videoInput.append(buffer)
                        }
                    } else if bufferType == .audioApp {
                        if let audioInput = self.audioInput, audioInput.isReadyForMoreMediaData {
                            audioInput.append(buffer)
                        }
                    }
                }
            }
        }

        public func finishWriting() {
            writeQueue.sync {
                self.assetWriter?.finishWriting(completionHandler: {
                    print("finishWriting")
                    PHPhotoLibrary.shared().performChanges({
                    PHAssetChangeRequest.creationRequestForAssetFromVideo(atFileURL: URL(fileURLWithPath: self.filePath))}) { saved, error in
                    if saved {
                    let alertController = UIAlertController(title: "Your video was successfully saved", message: nil, preferredStyle: .alert)
                    let defaultAction = UIAlertAction(title: "OK", style: .default, handler: nil)
                    alertController.addAction(defaultAction)
                    if let topVC = UIApplication.getTopViewController() {
                        topVC.present(alertController, animated: true, completion: nil)
                    }
                    }
                }
            })
        }
    }
Now we can go to the final stage of our demo. When the user taps on screen we need to start the screen recording.
Create Start Capture function as following:
func startCapture() {
    screenRecorder.startCapture(handler: { (buffer, bufferType, err) in
        self.isRecording = true
        self.assetWriter!.write(buffer: buffer, bufferType: bufferType)
    }, completionHandler: {
        if let error = $0 {
            print(error)
        }
    })
}
Method of Screen recorder will return as buffer and buffer type, which we need to pass to the assetwriter. AssetWriter will write this buffer into the URL, which we need to pass to assetwriter initially.
We have created an object of AssetWriter assetWrite and initialized as follows:
let outputFileName = NSUUID().uuidString + ".mp4"
assetWriter = AssetWriter(fileName: outputFileName)
Now, when the user double taps on the screen, screen recording stops. So we will use stopCapture of screen recorder method as following:
func stopCapture() {
    screenRecorder.stopCapture {
        self.isRecording = false
        if let err = $0 {
            print(err)
        }
        self.assetWriter?.finishWriting()
    }
}
As we are not writing any buffer into the assetWriter, we need to tell assetWriter to finish writing and generate output video URL. Now AssetWriter will finish writing and it will ask the user for permission to store video in the user photo library and if the user approves permission it will be saved there.
AssetWriter has finishWritng function for doing this.
public func finishWriting() {
    writeQueue.sync {
        self.assetWriter?.finishWriting(completionHandler: {
            print("finishWriting")
            PHPhotoLibrary.shared().performChanges({
                PHAssetChangeRequest.creationRequestForAssetFromVideo(atFileURL: URL(fileURLWithPath: self.filePath))
            }) { saved, error in
                if saved {
                    let alertController = UIAlertController(title: "Your video was successfully saved", message: nil, preferredStyle: .alert)
                    let defaultAction = UIAlertAction(title: "OK", style: .default, handler: nil)
                    alertController.addAction(defaultAction)
                    if let topVC = UIApplication.getTopViewController() {
                        topVC.present(alertController, animated: true, completion: nil)
                    }
                }
            }
        })
    }
}
Note: Some developers might get confused that RPscreenRecorder also provides startRecording and stopRecording but we have used startCapture and stopCapture.
Why is it so?
Here’s an image to answer it
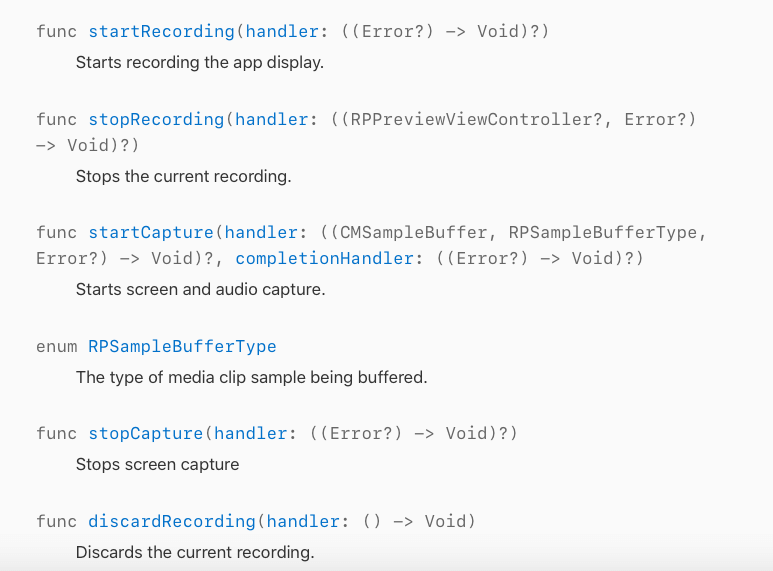
startRecording will start recording the app display. When we use startRecording method, to end recording we need to call stopRecroding method of RPscreenRecorder.
When we are running an AVSession and want to record screen, at that time we need to use startCapture method.
startCapture will start screen and audio capture. The recording initiated with startCapture must end with stopCapture.
Summing up
We hope that you found this iPhone tutorial useful and your concepts about iPhone dual camera video recording are clear. You can find the source code of this record front and back camera same time iPhone illustration on Github.
If you have any queries or think something is missing in this tutorial or any questions regarding iPhone app development, feel free to share. We are a leading iOS app development company and have developed over 2500 iOS apps and 1500 Android apps successfully.
Have an iPhone app idea? Want to create an app on the iOS platform with advanced features and functionalities like this one? Schedule a free consultation with the with our mobile app consultant by filling our contact us form.
